It’s that time of year again. The grass is growing, and your Snapper riding mower needs to be in tip-top shape to handle the job. But first, you need to change the battery.

Here’s a quick guide on how to do just that.
If you own a Snapper riding mower, you will eventually need to change the battery. Fortunately, this is a relatively easy task that can be completed in just a few minutes.
Here is a step-by-step guide to changing the battery in your Snapper riding mower:
1. Park your mower on a level surface and turn off the engine. Remove the key from the ignition and set it aside.
2. Locate the battery compartment under the seat of your mower. It is typically latched shut with a simple lever or knob.
3. Once you have opened the battery compartment, disconnect the negative (-) black cable first, followed by the positive (+) red cable. These cables are usually clearly labeled for easy identification.
4. Cleaning out debris or corrosion inside the compartment with the old battery removed using a dry cloth or brush. This will help ensure optimal contact between your new battery and the terminals within the compartment.
5. Place your new battery inside the compartment (positive side up) and reattach both cables according to their label (positive first, then negative).
Be sure to tighten each connection securely before moving on to avoid any accidental sparking or shorts. Click here to find out how the battery functions.
How to Operate a Snapper, Riding Mower?
If you’re lucky enough to have a Snapper riding mower, you know that they are built to last. But even the best machines need a little care and maintenance to stay in top shape.
Here are some tips on operating your Snapper riding mower so that it keeps running smoothly for years to come:
| Tip one | Before you start the engine, check the oil level and fill as needed. Then, check the air filter and clean or replace it if necessary. It’s also a good idea to check the blades and sharpen or replace them if they are dull. |
| Tip two | Once everything is checked and ready to go, start the engine and let it warm up for a few minutes before mowing. |
| Tip three | When ready, engage the blade lever and mow in a back-and-forth motion across your lawn. Be sure to overlap each row slightly, so you don’t miss any spots. |
| Tip four | If you need to stop for any reason, disengage the blade lever before coming to a complete stop. This will help prevent accidental injuries and damage to your blades or engine. |
| Tip Five | When you’re finished mowing, turn off the engine and remove the key before doing any maintenance on your machine. Cleaning the deck is essential – use a hose or brush (never put water inside the deck)to remove grass clippings from underneath. You should also regularly oil moving parts like spindles and pulleys to keep them from rusting or seizing up over time. |
Snapper Rear Engine Rider Battery Replacement
To replace the battery in a Snapper Rear Engine Rider, you will need to follow these steps:
| Step one | Park the rider on a level surface and turn off the engine. |
| Step two | Remove the seat by loosening the knob at the front of the seat and sliding it forward. |
| Step three | Locate the battery cover under the seat and remove it by unscrewing the two bolts that hold it in place. |
| Step four | Disconnect the battery’s negative (-) terminal first, then disconnect the positive (+) terminal. |
| Step five | Remove the old battery from its tray and dispose of it properly. Do not put it in your trash can! |
| Step six | Place the new battery in its tray and reconnect both terminals, making sure to connect the positive (+) terminal first and then tighten both terminals securely with a wrench or pliers. |
How to Change Battery in Husqvarna Riding Lawn Mower?

If you own a Husqvarna riding lawn mower, you will eventually need to change the battery. A lawn mower battery typically has 12 amp hours.
While this is a relatively simple process, there are a few things you need to know before getting started. In this blog post, we’ll walk you through everything you need to know about changing the battery in your Husqvarna riding lawn mower.
- First, it’s important to note that there are two types of batteries used in Husqvarna riding lawnmowers: lead-acid and lithium-ion. Lead-acid batteries are the most common type and are typically less expensive than lithium-ion batteries. However, they also require more maintenance and have shorter lifespans than lithium-ion batteries.
- Lithium-ion batteries are newer technology and offer several benefits over lead-acid batteries, including longer life spans and lower maintenance requirements. However, they typically cost more upfront. When it comes time to change your battery, you’ll first need to determine which type of battery you have.
- You can find this information in your owner’s manual or the sticker on the side of the battery itself.
Once you know which type of battery you have, follow these steps: If your mower has a lead-acid battery:
- Remove the negative cable from the terminal first, then remove the positive cable.
- Use a socket wrench to loosen and remove the bolts that hold the battery in place. Be careful not to drop or damage the old battery as you remove it from the mower.
- Carefully insert the new lead-acid battery, ensuring it is properly seated and aligned with the bolt holes. Slowly tighten down each bolt until snug (do not overtighten).
- Reconnect both cables (positive first), ensuring they are tight against their respective terminals without being cross-threaded or loose-fitting.
- Start up your mower and test it out!
How to Remove Battery from Craftsman Riding Mower?
It’s easy to remove the battery from a Craftsman riding mower:
- First, disconnect the negative terminal of the battery.
- Next, use a wrench to loosen the bolts that hold the battery in place.
- Finally, lift the battery and set it aside in a safe place.
Snapper SR1028 Battery
You have a few options when finding the best battery for your Snapper SR1028 riding lawn mower. You can either go with a lead-acid battery, the most common battery used in riding lawnmowers, or opt for a lithium-ion battery. Lithium-ion batteries are becoming increasingly popular in riding lawnmowers because they offer several benefits over lead-acid batteries.
It is Lightweight
First, lithium-ion batteries are much lighter than lead-acid batteries, so they don’t add as much weight to the mower. This is important because it can help improve the mower’s maneuverability and make it easier to push around.
It Holds More Charge
Second, lithium-ion batteries hold their charge much longer than lead-acid batteries.
This means you won’t have to worry about recharging your battery often. And when you do need to recharge it, it will only take a fraction of the time it would take to recharge a lead-acid battery.
It Doesn’t Require Heavy Maintenance
Third, lithium-ion batteries don’t require any maintenance as lead-acid batteries do.
With a lead-acid battery, you have to check the water level and add water, if necessary, regularly. With a lithium-ion battery, no maintenance is required – just set it and forget it!
It is Environment Friendly
Finally, lithium-ion batteries are more environmentally friendly than lead-acid batteries.
They don’t contain any toxic materials and can be recycled at the end of their lifespan.
Disconnect Lawn Mower Battery for Winter

When the temperatures start to drop and winter sets in, it’s essential to take some steps to prepare your lawn mower for the colder months. One of the most important things you can do is disconnect the battery.
Leaving your battery connected during winter can cause several problems:
- The cold weather can shorten the life of your battery and make it less effective.
- Additionally, if your lawn mower is stored in an unheated area, the battery could freeze and crack, ruining it.
To avoid these issues, simply disconnect the negative terminal of your battery before storing your lawn mower for winter.
If you’re unsure how to do this, consult your owner’s manual or take it to a professional mechanic. Once the negative terminal is disconnected, cover the exposed end with a piece of tape or plastic so that it doesn’t accidentally come into contact with anything else and create a short circuit. With just a few minutes of effort, you can help ensure that your lawn mower battery lasts for many winters!
Briggs And Stratton Lawn Mower Battery Replacement
If your lawn mower doesn’t start, the problem may be with the battery. Fortunately, replacing a lawn mower battery is a relatively easy task that you can do yourself. This article will walk you through removing an old battery and installing a new one on a Briggs & Stratton lawn mower.
Tools
- New Lawn Mower Battery
- Screwdriver
- Wrench (optional)
Step One
Disconnect the Negative Battery Terminal The first step is to disconnect the negative terminal of your old battery.
You can do this by loosening the terminal clamp with a screwdriver and pulling the cable off the terminal. If your battery is mounted in a difficult-to-reach location, you may need to use a wrench to loosen the clamp. Once the negative terminal is disconnected, proceed to Step 2.
Step Two
Disconnect the Positive Battery Terminal Now, it’s time to disconnect the positive terminal of your old battery. Again, loosen the terminal clamp with a screwdriver and remove the cable from the terminal post.
Be careful not to touch any metal parts of your lawn mower while doing this, as you could create a spark that could damage sensitive electronic components. With both terminals disconnected, you can now remove your old batteries (if there are multiple). Now install the batteries.
Snapper Re130 Battery
If you’re in the market for a new battery for your Snapper Re130 lawn mower, there are a few things you’ll want to keep in mind. Here’s a look at what you need to know to choose the right battery for your needs.
Size of the Battery
The first thing to consider is the size of the battery. The Snapper Re130 takes a 20V 6Ah battery, so make sure you get one that’s that size. You don’t want to end up with a battery that’s too small or too big – either one could cause problems with your mower.
Check the Amp Hours
Next, look at the amp hours (Ah) of the battery.
This measures how much power the battery can store, and it’s essential to choose a Battery with enough Ah to meet your needs. You’ll need a higher Ah rating if you have a large lawn or plan on using your mower for extended periods. Conversely, if you have a smaller lawn or won’t be using your mower very often, you can get away with a lower Ah rating.
Check the Warranty
Finally, check the warranty on the batteries you’re considering. You want to ensure you’re getting a good quality product that will last for several years, and choosing one with a good warranty will give you peace of mind in knowing that if something goes wrong, you’ll be covered.
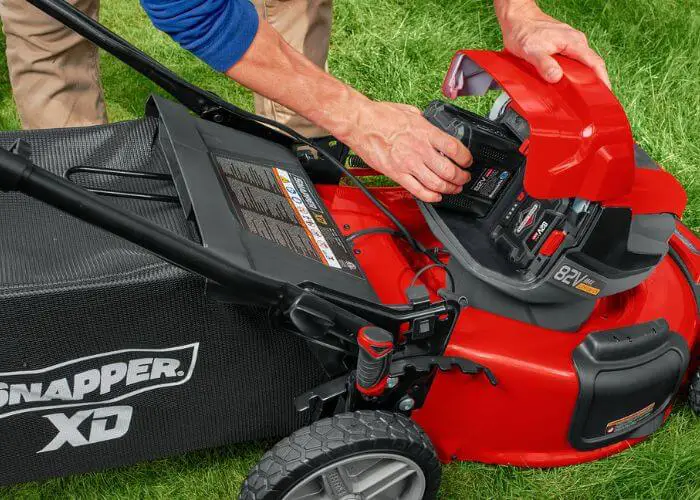
How Do You Take a Battery Out of a Snapper Lawn Mower?
Assuming you need to replace the battery:
1. Park your Snapper lawn mower on a flat surface and turn it off. Disconnect the spark plug wire from the spark plug to prevent accidental starting while working on the mower.
2. Remove the seat by loosening the knob at the center of the seat and sliding it off of the post.
3. Locate the battery under the seat. Two straps on each side of the battery will be held in place.
4. Release both straps by squeezing in on each side of the strap and pushing up on it until it pops off of its retainer tab.
5. Lift out the old battery and set it aside (preferably on a piece of cardboard or newspaper to avoid shorting it out)
6. Place your new battery in position and secure it with both straps, making sure that they are tight enough so that they won’t vibrate loose during operation but not so tight that they put undue stress on the battery terminals themselves.
How Do You Charge a Snapper Riding Mower Battery?
To charge a Snapper riding mower battery, you will need to connect the positive and negative terminals of the battery to the corresponding posts on the charger. Make sure that the charger is rated for the voltage of your battery; otherwise, you could damage the battery or the charger. Once connected, turn on the charger and let it run until the indicator light shows that the battery is fully charged.
Should I Remove the Battery from My Riding Lawn Mower for the Winter?
If you live in an area where the temperature dips below freezing during winter, it’s a good idea to remove the battery from your riding lawn mower and store it indoors. This will prevent the battery from freezing and cracking, leading to leaks and ultimately damaging the battery beyond repair. First, disconnect the negative terminal (black cable) from the battery post to remove the battery.
Then, disconnect the positive terminal (red cable) and carefully lift the battery out of its compartment. Store the battery in a cool, dry place until spring.
How Do You Change the Battery in a Riding Lawn Mower?
Most riding lawnmowers have a 12-volt battery that powers the engine. The battery is under the seat, and you’ll need to remove it to change it.
Here’s how:
| Step one | Park your riding lawn mower on a level surface and turn off the engine. Disengage the blade clutch and set the parking brake. |
| Step two | Remove the seat by unscrewing the bolts that hold it. |
| Step three | Using a wrench or pliers, loosen the nuts on both terminals. Carefully disconnect the cables from each terminal, noting which cable goes where (the positive cable will usually be red). |
| Step four | Lift out the old battery and replace it with a new one of the same size and voltage rating. Reconnect the cables to their respective terminals, ensuring they’re tight, so they don’t come loose while using the mower. |
End Note
When it’s time to replace the battery in your Snapper riding mower, it’s essential to know how to do it correctly. The first step is disconnecting the negative cable from the battery, followed by the positive cable. You can then remove the old battery and install the new one, making sure to connect the cables in reverse order. Click here to read more about lawn mower batteries.