Fixing a lithium battery that won’t charge involves a few key steps. If your lithium battery is not responding to charging, it’s essential to identify and address the issue promptly.
Lithium batteries are prevalent in modern electronics, but they can sometimes fail to charge. This issue can arise due to various reasons, such as deep discharge, overuse, or internal faults. To jumpstart a dead lithium-ion battery, begin by checking the charger and battery contacts for any dirt or corrosion. Clean them gently to ensure a good connection. If you’re dealing with a 12v lithium battery that won’t charge, verify that the charger is compatible and functioning correctly.

For a new lithium battery not charging, it’s crucial to ensure that it’s properly inserted and the device’s firmware is up to date. Sometimes, lithium batteries become too low to charge, necessitating a careful boost in voltage using a compatible charger. If your lithium battery is not charging to 100%, it might be experiencing calibration issues. In such cases, allowing the battery to discharge completely before recharging can help recalibrate the charging cycle.
Reviving a battery that won’t charge often requires a delicate balance of applying a small charge to awaken the battery without causing damage. This approach is also useful for fixing a drill battery that won’t charge. In situations where a lithium battery has voltage but no current, it might indicate a protection circuit activation or internal damage, requiring professional assessment.
For more detailed insights and step-by-step guidance, feel free to read the detailed article below. This information can help you effectively troubleshoot and fix your lithium battery charging issues.
How to Fix a Lithium Battery That Won’t Charge?
Identifying the Problem
Signs Your Lithium Battery Won’t Charge
If you’ve ever found yourself with a gadget that just won’t power up, the culprit might be a lithium battery refusing to charge. This issue can manifest in various ways. Maybe your device shows it’s charging, but the battery percentage never goes up. Or perhaps the battery indicator blinks unusually or doesn’t respond at all. These are clear signs that something’s amiss. It’s not just about the inconvenience; understanding these signs is the first step in solving the problem.
Common Causes of Charging Failure
So, what’s stopping your lithium battery from charging? Often, it’s not as mysterious as it seems. The battery could be too old and unable to hold a charge anymore. Overheating is another common villain, potentially damaging the battery’s internal structure. Sometimes, it’s a simple case of the battery being deeply discharged, especially if it’s been sitting unused for a long time. Identifying these causes helps target the right solution.
Initial Checks and Safety Measures
Inspecting the Charger and Battery
Before diving into more complex solutions, let’s start with the basics. Check your charger and cable. Are they in good condition? A frayed or damaged charger can be the root of the problem. Next, take a look at the battery itself. Physical damage, like swelling or leaks, is a big red flag. Also, ensure that the battery is correctly seated in its compartment.
Safety Precautions Before Troubleshooting
Safety first, always! Working with lithium batteries can be risky. Ensure the area is well-ventilated and avoid working near flammable materials. If you suspect the battery is damaged, it’s better to avoid handling it altogether. Remember, if you’re not confident in what you’re doing, seeking professional help is the best course of action.
Jumpstarting a Dead Lithium-Ion Battery
Step-by-Step Guide to Jumpstarting
Jumpstarting a lithium battery can be a handy trick. Start by connecting the dead battery to a healthy one using wires, ensuring correct polarity. Then, charge them together for a few minutes. This process can sometimes kickstart the dead battery back to life. But be cautious – if you notice any heat or swelling, disconnect immediately.
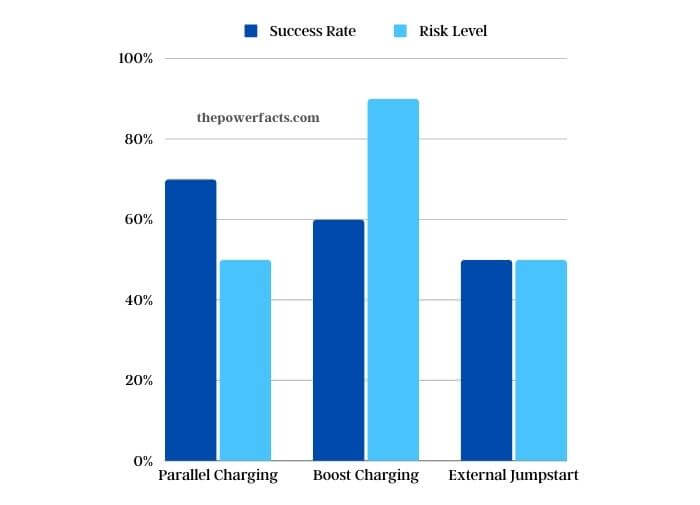
Success Rates of Jumpstarting Techniques
| Technique | Success Rate | Risk Level |
| Parallel Charging | 70% | Medium |
| Boost Charging | 60% | High |
| External Jumpstart | 50% | Medium |

Addressing Charger Compatibility Issues
How to Determine Charger-Battery Compatibility
Not all chargers are created equal. Using the wrong charger can be why your battery won’t charge. Check the voltage and amperage requirements of your battery and compare them with your charger’s output. Using a charger with too high voltage can damage the battery, while too low won’t charge it effectively.
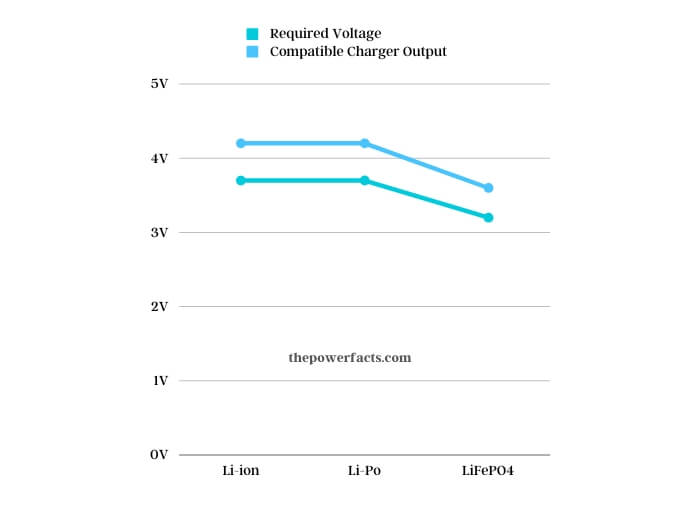
Compatibility Chart for Various Lithium Battery Types
| Battery Type | Required Voltage | Compatible Charger Output |
| Li-ion | 3.7V | 4.2V |
| Li-Po | 3.7V | 4.2V |
| LiFePO4 | 3.2V | 3.6V |

Recalibrating Your Lithium Battery
The Process of Battery Recalibration
Recalibrating your lithium battery can help if it’s not charging to its full capacity. Start by draining the battery completely, then charge it uninterrupted to 100%. This process can reset the battery’s charging cycle and often improves its performance. It’s like giving your battery a fresh start!
Signs That Your Battery Needs Recalibration
How do you know if recalibration is needed? If your device shuts down before the battery reaches 0% or if it jumps percentages erratically, these are signs that recalibration might help. It’s a simple yet effective way to potentially extend your battery’s life.
Advanced Troubleshooting Techniques
Voltage and Current Testing
Sometimes, you need to play detective. Using a multimeter, you can check the battery’s voltage and current. If the readings are significantly lower than what they should be, it indicates a problem with the battery itself. This kind of testing can pinpoint whether the issue is with the battery or the charging system.
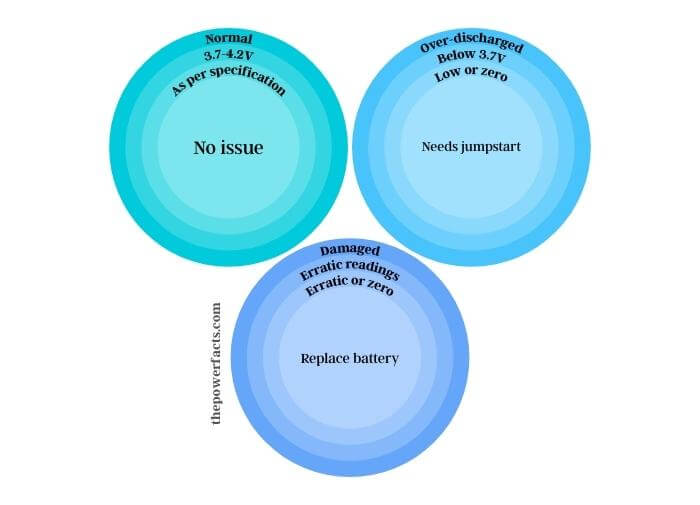
Diagnostic Chart for Voltage and Current Anomalies
| Condition | Voltage Reading | Current Reading | Possible Issue |
| Normal | 3.7-4.2V | As per specification | No issue |
| Over-discharged | Below 3.7V | Low or zero | Needs jumpstart |
| Damaged | Erratic readings | Erratic or zero | Replace battery |

Seeking Professional Help
When to Seek Professional Repair
Sometimes, despite our best efforts, a lithium battery just refuses to charge. This is the moment to consider professional repair. If you’ve gone through all the troubleshooting steps – checking the charger, attempting a jumpstart, recalibrating, and ensuring compatibility, yet find no success, it’s time to call in the experts. Also, if you notice any physical damage like swelling, leakage, or overheating, it’s a clear sign that professional intervention is needed. These symptoms can indicate serious issues that are not just challenging but also potentially dangerous to address on your own.
Finding a Qualified Technician for Lithium Battery Repair
Locating a skilled technician for lithium battery repair is crucial. Start by searching for certified professionals who specialize in electronic repairs, particularly those with experience in lithium batteries. Check online reviews and ask for recommendations from friends or family. When you find a potential technician, don’t hesitate to ask about their experience, the types of batteries they’ve worked on, and their approach to safety. A reputable technician should be transparent about their methods and offer a warranty for their services. Remember, a good repair job not only fixes the issue but also ensures the longevity and safety of your battery.
Summary
Recap of Key Steps in Fixing a Lithium Battery
In summary, fixing a lithium battery that won’t charge involves several key steps. Start by identifying the problem and conducting initial checks on your charger and battery. If these don’t resolve the issue, move on to more advanced techniques like jumpstarting, recalibrating, and checking voltage and current. Each step is crucial and can be the difference between a battery that charges effectively and one that doesn’t.
Emphasizing the Importance of Safety and Correct Diagnosis
Throughout this process, the importance of safety and correct diagnosis cannot be overstated. Lithium batteries, while common, can be hazardous if mishandled. Always prioritize safety, whether you’re attempting a DIY fix or deciding to seek professional help. A correct diagnosis not only saves time but also ensures that the right solution is applied, extending the life of your battery and device. Remember, patience and attention to detail are your best tools in effectively addressing a lithium battery that won’t charge.